StreamElements Overlay
Prerequisites
I have written this document on the assumption that the following prerequisites are in place:
- You are an Official Warsaken streamer with access to download Overlays, Wait Screens, Banners and Music.
- You are using Windows 10 or 11; these instructions will work on Mac or Linux. However, some steps may vary.
- You have unzipped the warsakenstreamer package in an accessible location on your PC; for example, C:\Warsaken
- You have access to a Stream Elements account connected to your Twitch.
- You have installed VLC Media Player (to enable the VLC Media plugin in OBS).
- You have installed OBS Studio 29 or above.
For the best viewer experience, you should stream at 60 frames per second if your computer and broadband can do so. Other common values are 30 frames per second or 24 frames per second - if you use a value other than 60, adapt the instructions below to use your chosen framerate.
This guide is incompatible with older versions of OBS or other broadcast and overlay tools. Although some of the principles still apply.
Font
The Warsaken brand guidelines include using the Roboto font; this font is already available on Stream Elements.
OBS & StreamElements
Starting Soon and Be Right Back Scenes
The streamer pack comes with two full-screen videos: “Starting Soon” and “Be Right Back”.
Add these to OBS as separate scenes; first, we start with Starting Soon:
- Switch to OBS and create a new empty scene by clicking the + underneath Scenes and name it “Starting Soon”.
- Click the + button under Sources, select VLC Video Source, and name it
Starting Soon Video. - Click the + next to the playlist and select
C:\Warsaken\Official Warsaken Theme\Warsaken Wait Screens\Wait_Starting_Soon.mp4 - Ensure that Loop Playlist is selected, then click OK.
Next, do similar for Be Right Back:
- Switch to OBS and create a new empty scene by clicking the + underneath Scenes and name it “
Be Right Back”. - Click the + button under Sources, select VLC Video Source, and name it “
Be Right Back Video”. - Click the + next to the playlist and select
C:\Warsaken\Official Warsaken Theme\Warsaken Wait Screens\Wait_Be_Right_Back.mp4 - Ensure that Loop Playlist is selected, then click OK.
Overlay Setup
In this section, I will show you how to create a scene named “Warsaken Overlay”, containing all your overlay elements. Then, you will add this “Warsaken Overlay” scene as a source to all other scenes; this is called scene nesting and allows OBS to use less CPU and more efficiently manage state across scenes.
Let’s setup the Overlay in Stream Elements:
- Visit your Stream Elements Dashboard in a browser, then expand out “Streaming Tools” and click “Overlays”.
- Click Create New Overlay, set the resolution to “
1080p”, and click start. - Name the overlay: “
Warsaken Official”, - Click the🔗icon in the top right to copy the Overlay URL to your clipboard.
- Switch to OBS and create a new empty scene by clicking the + underneath Scenes and name it “
Warsaken Overlay”. - In the Sources panel, click the + at the bottom and select Browser:
- Name it
Stream Elements Overlay, then click OK. - In the next screen, paste the URL you copied from Stream Elements in the URL box,
- Set the Width to
1920, - The Height to
1080, - Check Use Custom Framerate and set it to
60, - Check Control Audio via OBS,
- Remove the contents of the Custom CSS box,
- Check the Shutdown source when not visible checkbox,
- Check the Refresh browser when scene becomes active checkbox.
- Name it
- The new source should fill the entire scene; if it overflows the edge: right-click the source and choose Transform, then Fit to Screen.
Great work; you are now well on setting up your Warsaken Overlay in Stream Elements.
Warsaken Overlay
Back in Stream Elements and the Header and Lower frames:
- Click Add Widget, and choose Static / Custom and Video.
- Click Change Video, then upload and select
C:\Warsaken\Official Warsaken Theme\Warsaken Frame\Frame_Header.webm. - Set Video Size to Scaled to Fit.
- Expand out Position, Size and Style and set the Width and Height:
- Width:
1920 - Height:
1080 - Top:
0(default) - Bottom:
0(default)
- Width:
- Double-click the widget in the left-hand panel to rename it
Frame Header. - Click the + in the bottom right-hand corner of the canvas and choose Static / Custom and Video.
- Click Change Video, then upload and select
C:\Warsaken\Official Warsaken Theme\Warsaken Frame\Frame_Lower.webm. - Again set Video Size to Scaled to Fit.
- Expand out Position, Size and Style and set the Width and Height:
- Width:
1920 - Height:
1080 - Top:
0(default) - Bottom:
0(default)
- Width:
- Double-click the widget in the left-hand panel to rename it “
Frame Lower”.
Add a camera in a frame
Using a camera is a personal choice; neither Twitch nor Warsaken require you to stream with a camera on. So skip this section if you wish to avoid having your face on camera.
If you cannot use either a Green Screen or Background Removal, Warsaken has provided a frame for your camera.
Click the + in the bottom right-hand corner of the canvas and choose Static / Custom and Image.
- Click Change Image, then upload and select
C:\Warsaken\Official Warsaken Theme\Warsaken Frame\Frame_Streamer_Circle_Right.png. - Leave Image Size set to Auto.
- Expand out Position, Size and Style and set the Width and Height:
- Width:
1920 - Height:
1080 - Top:
0(default) - Bottom:
0(default)
- Width:
- Double-click the widget in the left-hand panel to rename it “Camera Frame”.
If you wish your camera to appear on the left of the screen rather than the Right, use \Frame_Streamer_Circle_Left.png instead.
Click Save in the top right-hand corner to save your overlay.
Finally, switch back to OBS, select the “Stream Elements Overlay” source, and click the Refresh button under the preview.
It should now look like this:
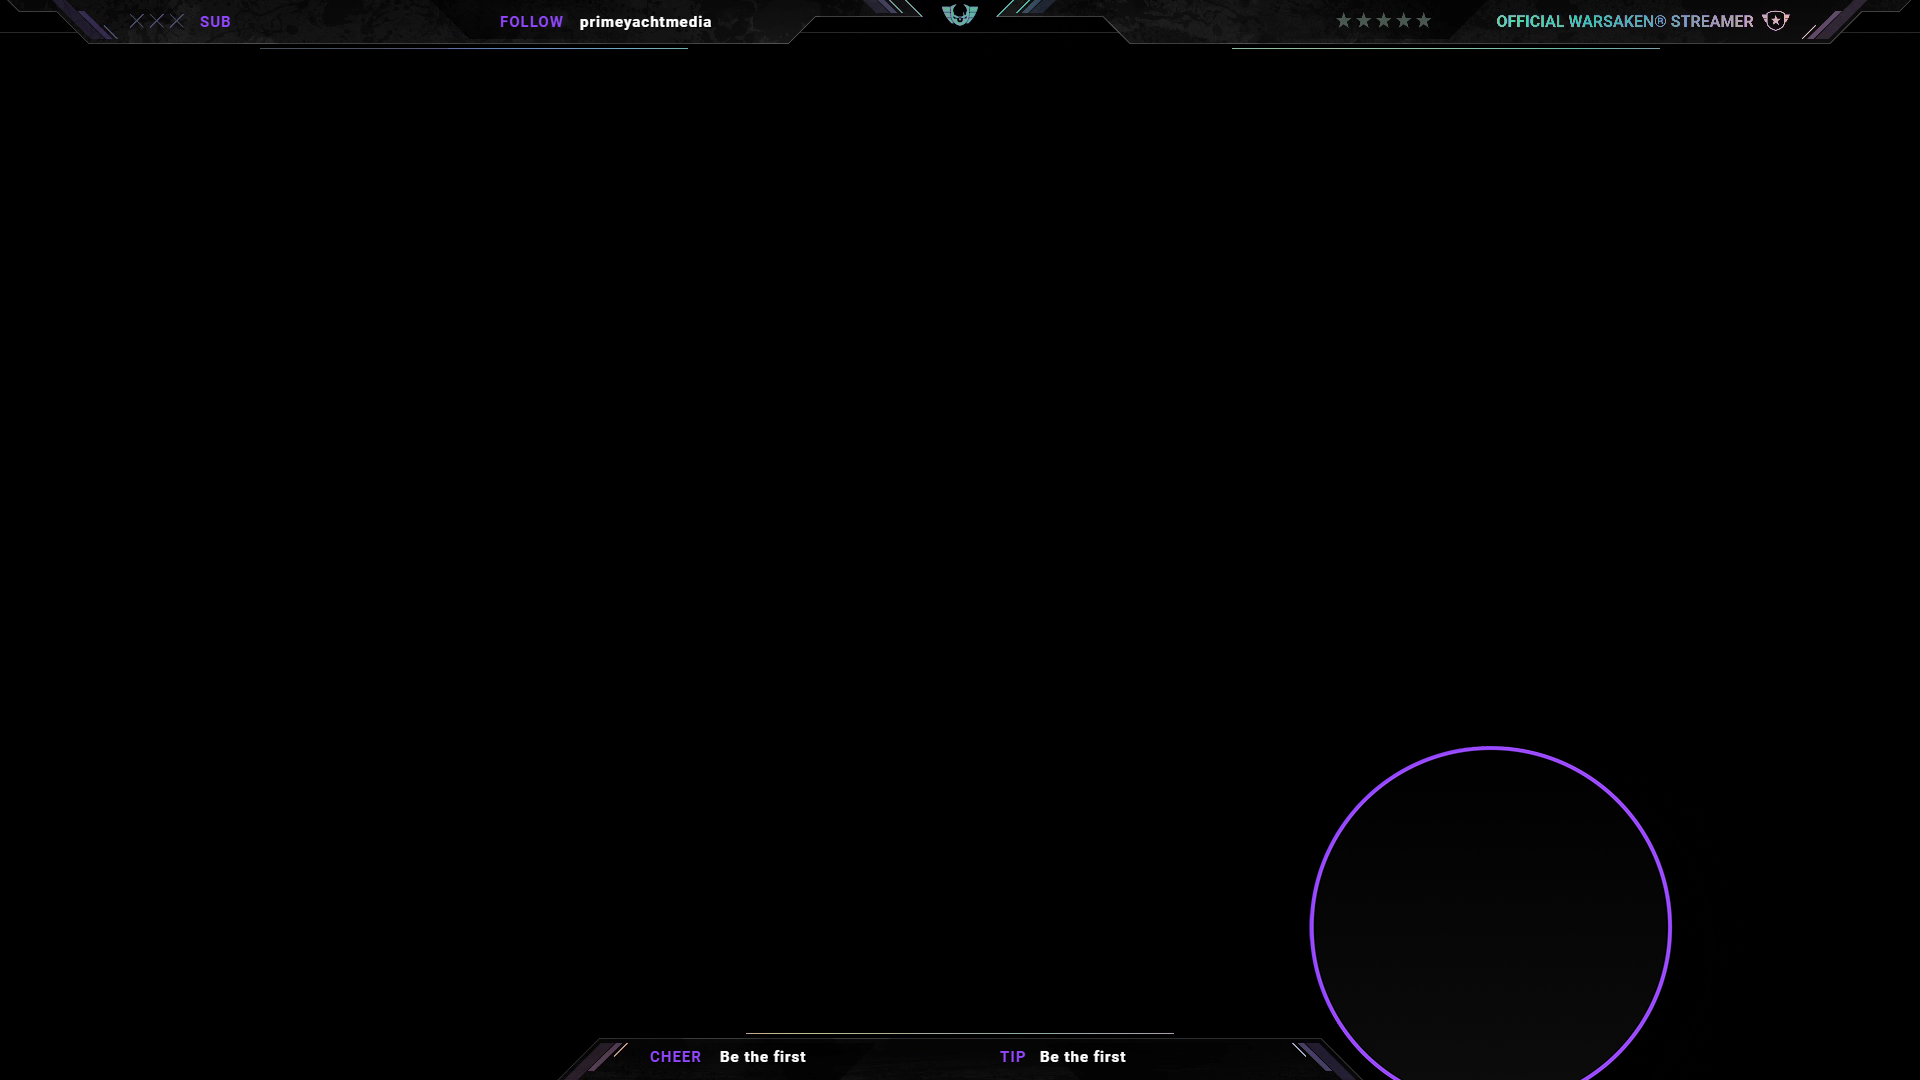
The remainder of this section is completed entirely in OBS. Stream Elements is not used to manage the camera.
Add your camera to OBS:
- With the “Warsaken Overlay” scene selected, click the + in the Sources panel and select Video Capture Device.
- Name it “
Main Camera”, accept the defaults and click OK. - Right-click the “Main Camera” source and choose Filters.
- Under Effects Filters, click the + and choose Image Mask/Blend; name it “
Warsaken Mask”:- Select
C:/Warsaken/Official Warsaken Theme/Warsaken Frame/Frame_Streamer_Head_Mask.png - Click OK
- Select
- Again under Effects Filters, the + and choose Color Correction, and accept the default name:
- Adjust the Gamma, Contrast, Brightness and Saturation sliders to achieve a darker colour grade.
- Every camera and lighting scenario is different, so you must judge the settings for yourself, however:
- Gamma: increase slightly,
- Contrast: increase to around 1.5,
- Brightness: decrease slightly,
- Saturation: increase slightly.
- Click OK to close the filters.
- Right-click the camera source, then choose Edit Transform:
- Set the Position to
1051 px,728 px. - Set the Size to
873 px,491 px. - Click Close.
- Set the Position to
Latest Sub, Follower, Tips and Bits
Note: in most jurisdictions, there is a difference between a “Donation” and a “Tip”. PayPal is less likely to uphold a refund of a “Tip” than a “Donation”. Therefore try to use the word “Tip” when viewers send you fiat currency.
In this section, you will add dynamic elements starting with the Latest Subscriber to your Overlay to display the latest subscribers, followers, tips, and bits:
Click the + in the bottom right-hand corner of the canvas and choose Static / Custom and Text.
- Set the Message to “SUB”,
- Expand out Position, Size and Style and set:
- Top:
15px - Bottom:
200px
- Top:
- Expand out Text Settings and set:
- Font:
Roboto, - Color:
#9247ff, - Size:
15, - Line Height:
1, - Ensure the B is selected to make the font bold,
- Uncheck Text Shadow.
- Font:
- Click the + in the bottom right-hand corner of the canvas again and choose Labels → Subscribers → Latest → Latest Subscriber.
- Set the Message to “
{name}”, - Expand out Position, Size and Style and set:
7. Top:
15px8. Bottom:240px - Expand out Text Settings and set:
- Font:
Roboto, - Color:
#fff, - Size:
15, - Line Height:
1, - Ensure the B is selected to make the font bold,
- Uncheck Text Shadow.
- Font:
- Expand out Layers in the right-hand panel, double-click the new layer, and rename it
Subscriber.
Now we repeat the steps above for the Latest Follower:
Click the + in the bottom right-hand corner of the canvas and choose Static / Custom and Text.
- Set the Message to “
FOLLOW”, - Expand out Position, Size and Style and set:
- Top:
15px - Bottom:
500px
- Top:
- Expand out Text Settings and set:
- Font:
Roboto, - Color:
#9247ff, - Size:
15, - Line Height:
1, - Ensure the B is selected to make the font bold,
- Uncheck Text Shadow.
- Font:
- Expand out Layers in the right-hand panel, double-click the new layer, and rename it
Follower Label. - Click the + in the bottom right-hand corner of the canvas again and choose Labels → Followers → Latest → Latest Follower.
- Set the Message to
{name}, - Expand out Position, Size and Style and set:
- Top:
15px - Bottom:
580px
- Top:
- Expand out Text Settings and set:
- Font:
Roboto, - Color:
#fff, - Size:
15, - Line Height:
1, - Ensure the B is selected to make the font bold,
- Uncheck Text Shadow.
- Font:
- Expand out Layers in the right-hand panel, double-click the new layer, and rename it “Follower”.
Now we repeat the steps for the Latest Cheer:
Click the + in the bottom right-hand corner of the canvas and choose Static / Custom and Text.
- Set the Message to
CHEER, - Expand out Position, Size and Style and set:
- Top:
1050px - Bottom:
650px
- Top:
- Expand out Text Settings and set:
- Font:
Roboto, - Color:
#9247ff, - Size:
15, - Line Height:
1, - Ensure the B is selected to make the font bold,
- Uncheck Text Shadow.
- Font:
- Expand out Layers in the right-hand panel, double-click the new layer, and rename it
Cheer Label. - Click the + in the bottom right-hand corner of the canvas again and choose Labels → Bits → Latest → Latest Cheer.
- Set the Message to
{name} - {amount}, - Set No Data Text to “Be the first”,
- Expand out Position, Size and Style and set:
- Top:
1050px - Bottom:
720px
- Top:
- Expand out Text Settings and set:
- Font:
Roboto, - Color:
#fff, - Size:
15, - Line Height:
1, - Ensure the B is selected to make the font bold,
- Uncheck Text Shadow.
- Font:
- Expand out Layers in the right-hand panel, double-click the new layer, and rename it “Cheer”.
Finally, we repeat the steps for the Latest Tip:
Click the + in the bottom right-hand corner of the canvas and choose Static / Custom and Text.
- Set the Message to
TIP, - Expand out Position, Size and Style and set:
- Top:
1050px - Bottom:
1000px
- Top:
- Expand out Text Settings and set:
- Font:
Roboto, - Color:
#9247ff, - Size:
15, - Line Height:
1, - Ensure the B is selected to make the font bold,
- Uncheck Text Shadow.
- Font:
- Expand out Layers in the right-hand panel, double-click the new layer, and rename it
Tip Label. - Click the + in the bottom right-hand corner of the canvas again and choose Labels → Tips → Latest → Latest Tip.
- Set the Message to `{name} - {currency}{amount}``,
- Set No Data Text to “Be the first”,
- Expand out Position, Size and Style and set:
- Top:
1050px - Bottom:
1040px
- Top:
- Expand out Text Settings and set:
- Font:
Roboto, - Color:
#fff, - Size:
15, - Line Height:
1, - Ensure the B is selected to make the font bold,
- Uncheck Text Shadow.
- Font:
- Expand out Layers in the right-hand panel, double-click the new layer, and rename it “Tip”.
Alerts
Alerts provide audio and visual feedback when your viewers complete various actions; the Warsaken Streamer pack has support for the following activities:
- Cheers - A user tips bits, crypto or fiat currency to the streamer.
- Follow - A user follows your channel.
- Subscribe - A user subscribes to your channel.
- Raid - A fellow streamer raids your channel.
We need to add an Alert Box,
- Click the + in the bottom right-hand corner of the canvas and choose Alerts and Alert Box.
- Ensure that Follower, Subscriber, Tip, Cheer and Raid are Checked, and others are Unchecked.
- Expand out Position, Size and Style and configure as follows:
- Width:
1920 - Height:
1080 - Top:
0 - Left:
0
- Width:
- Expand out Settings, for each of the alert types (i.e. Follower, Subscriber, etc.) do the following:
- Click the “Cog” (⚙) next to the Alert.
- Click Change Video and select the appropiate video from this list:
- Follower:
Warsaken\Alert\New\Follower.webm - Subscriber:
Warsaken\Alert\New\Sub.webm - Tip:
Warsaken\Alert\Donation.webm - Cheer:
Warsaken\Alert\Donation.webm - Raid:
Warsaken\Alert\Raid.webm
- Follower:
- Click Clear Sound.
- Select the first layout: Text over image
- Set Alert Message to:
- Follower:
{name} - Subscriber:
{name} - Tip:
{name} tipped {currency}{amount}! - Cheer:
{name} cheered x{amount} - Raid:
{name} - {amount} viewers!
- Follower:
- Set Alert duration to
7. - For **Subscriptions and Bits ** expand out Variation Settings and remove each one:
- Click the Cog (⚙) next to the Variation.
- In the bottom right hand corner select Delete,
- Click Delete in the confirmation.
- Expand out Text settings:
- Under Pick a font select
Roboto. - Set the color to White:
#ffffff, - Set the Size to
30, - Click to center the text,
- Click the B to make th text bold,
- Right at the bottom change the Highlight Color to White:
rgb(255, 255, 255).
- Under Pick a font select
- Click Change Video and select the appropiate video from this list:
- Close the Alert Settings by clicking the “✕” at the top of.
- Click the “Cog” (⚙) next to the Alert.
Finally return to the Layers tab and double-click the AlertBox to rename it to Warsaken Alerts.
Stingers
Stingers, sometimes called idents, provide smooth transitions between two scenes in OBS. Stingers are one of the few things you need to implement in OBS directly. Therefore, we will not be using Stream Elements for this section.
All Warsaken Stingers are 2 seconds long (60 frames total), and the transition point must be correctly set halfway through the Stinger to avoid flickering scenes.
- Find the Scene Transitions dock in OBS; if it has been closed, you can access it through Docks -> Scene Transitions.
- Click the + button and select Stinger.
- Name it
Warsaken - Victor.- Select
Official Warsaken Theme\Warsaken Stingers\Stinger\001.webmfor the Video File. - Transition Point Style: Frame
- Transition Point (frame):
30
- Select
- Click the Preview Transition button; if everything is correct, the “A” in the preview will transition smoothly to “B”, with the Stinger hiding the transition.
You can add additional stingers if you want some variation in your transitions:
Stinger_001.webm: Victor, the AnonymousStinger_002.webm: Riku Ito, AceStinger_003.webm: Kyodo Lee, RoninStinger_004.webm: Sawuyer, the ResurgentStinger_005.webm: Queen Awati
The transition selected in Scene Transitions is the default transition for all scenes. However, you can override individual scene transitions by right-clicking the scene and selecting Transition Override.
Music
All of the Warsaken music by Numbskull is available in the streamer pack. However, you must ensure you mute the Warsaken music in-game, as this will only play during a game, leaving you with dead space between matches.
Then add a VLC Media source to a scene:
- Click the + button under Sources and select VLC Video Source.
- Name it
Warsaken Music- Check Loop Music;
- Click the + to the right of the playlist and select Add Directory, then select the following folders:
- “Music/Warsaken Tracks”
- “Music/NumbSkull Tracks”
- Click OK to close the properties.
- Now go through all scenes you want music in and add the source you just created.
- Click the + button under Sources and select VLC Video Source.
- Check Add Existing.
- Select “Warsaken Music”.
- Click OK.
Add Chat Timer
To comply with Warsaken Official guidance, you must configure Stream Elements to broadcast a message at least every 30 minutes to your chat:
- Open StreamElements Bot Timers,
- Click Add New Timer:
- Set the Name to
Numbskull. - Under Stream categories enter
Warsaken, and click Warsaken from the menu. - Set the response message to:
Like the music you’re listening to? Check out NumbSkull on SoundCloud and Spotify https:// www.soundcloud.com/numbskullmusic - Ensure Online interval is checked, and set the time to
29. - Ensure Offline interval is unchecked,
- Set Chat Lines to
5.
- Set the Name to
- FInally ensure the timer is enabled.
Optional: Add Sidechain Ducking
Sidechain Ducking means reducing the volume of background music or game sounds while you are talking. You can enable it in OBS as follows:
- Find the Audio Mixer panel and right-click Warsaken Audio, then select filters.
- Under Audio/Video Filters, click + and select Compressor.
- Name it
Ducking.- Ratio::
32:1 - Threshold:
-36dB - Attack:
100ms - Release:
600ms - Output Gain:
0dB - From Sidechain/Ducking Source, select the name of your microphone source.
- Ratio::
A complete tutorial on getting fantastic stream audio is outside of the scope of this tutorial. However, I recommend following EposVox’s tutorials on his Perfect your audio ASAP Playlist.